
Import from Authorize.net
If you’re migrating to Loop from a platform using Authorize, this guide helps you securely import customer payment details into Shopify. By connecting Authorize and using Loop’s migration utility, you can map payment methods without needing customers to re-enter card info. Once done, you can create and manage subscriptions directly in the Loop app, ensuring a smooth, hassle-free transition.
In this article
- Prerequisites for customer migration from Authorize.net
- Import customer data in Shopify
- Loop customer migration utility
- Export customer data from Authorize.net
- Migrating subscriptions
- Related articles
- Need help?
Prerequisites for customer migration from Authorize.net
Before setting up the process, we need to make sure these things are in place.
- You must have an active Authorize.net account having customer payment methods that needs to be migrated
- You would need to export the customer and payment data from your Authorize.net account
- You would need to set up and enable Authoize.net payment gateway (with the same account credentials you are transferring from) on your Shopify store.
Import customer data in Shopify
Before proceeding to migrate customer payment methods from Authorize, you can import the customer's basic data like name, email, and addresses using Shopify's native import tool available on the customer's page in your Shopify account.
Follow these steps to complete the process.
- Navigate to Shopify Admin > Customers > Import.

This step is optional if:
- Your customers already exist in Shopify, or
- You plan to use Loop’s customer migration utility (which includes name and email).
Loop customer migration utility
To streamline the migration process and easier to understand, we have made a customer migration utility inside the Loop app. Detailed instructions have been provided below to help you with the migration process.
Accessing the customer migration utility
Follow these steps to complete the process.
- Navigate to Loop Admin > Settings > Migrate Customers and Payment Methods.

- Select Authorize.net from the payment provider dropdown.
- Ensure Authorize.net is connected as a payment gateway on your Shopify store. This must be the same account that holds the customer data you're migrating.

To access and run the migration utility, two steps need to be completed.
- Connect Shopify payments as the main payment gateway on your store. You can follow the detailed instructions here: https://help.shopify.com/en/manual/payments/shopify-payments
- Connect Authorize account as a legacy payment gateway. You just need to click on the "Connect Authorize.net" button which will redirect you to the Authorize.net Legacy Gateway. Enter your account information. Make sure that this is the same account having the customers data which needs to be migrated


Export customer data from Authorize.net
Once you have connected your Authorize.net account to Shopify, you'll need to export your customer and payment data from Authorize.net.
Follow these steps to complete the process.
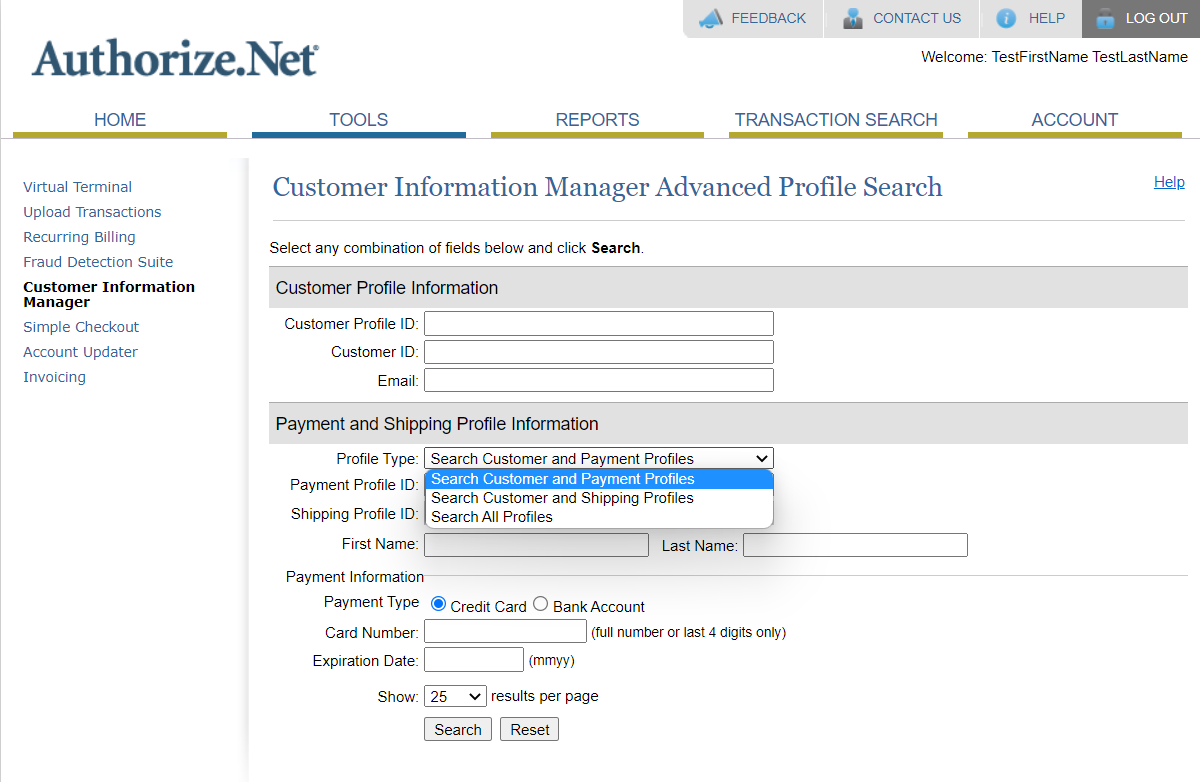
- Login to your Authorize.net account and click on the tab TOOLS.

- In the left navigation, click on the option Customer Information Manager (CIM)

- Now, in the Customer Information Manager window, click on Advanced Search

- Choose the option Search Customer and Payment Profiles from the Profile Type dropdown.
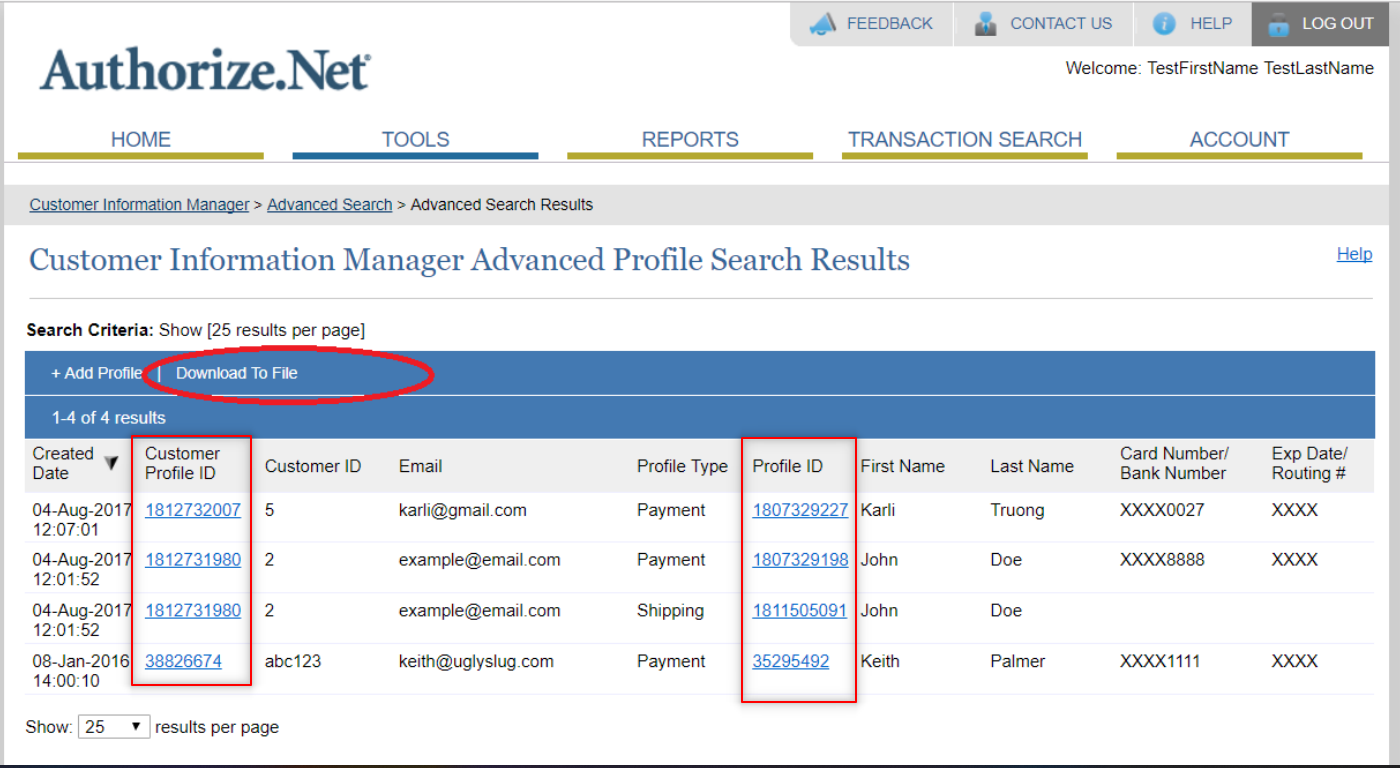
- In the Advanced Profile Search Results page, you can see the Customer Profile ID and the Profile ID which will be needed for the migration along with the Email. Click on the option Download to File and that's it.
Using the migration utility
Once the migration requirements are completed, the utility will be available to use. You would have to keep the exported authorize payment methods file in a separate tab in order to paste the Customer Profile ID and Payment Method ID in the migration utility section.
- If you have imported the basic customer data before, then you can simply paste the customer email address, Customer Profile ID, and Payment Method ID in the respective fields and click on "Save Customer" button.
- If the customer is existing with the added email address, then the authorize payment info will be added with all other customer data as before. If the customer was not present before, then a new customer will be auto-created in Shopify.

- This is great but I have more than 100 customers to migrate.
Don't worry if you have a long list of customers to be migrated. You can connect with our support team to assist you with the migration process. You just need to send us the exported Authorize.net customer data csv file or (name, transaction key) to migrations@loopwork.co
Migrating Subscriptions
Once you have migrated all the customers and payment methods from Authorize.net, you will be able to re-create the subscription using their saved Authorize.net payment methods. You can use the "Create Subscription Manually" tool in the Loop admin portal to replicate their existing subscription including billing schedule, products subscribed, shipping address and prices. Once the subscription is created, your customers will receive a notification along with the customer portal link to manage their subscriptions.
Learn more about Migrating Subscriptions
Don't forget to pause/cancel the existing subscriptions in the other subscription app after successful migration to avoid double billing issues for your customers.
Related articles
Here are some related articles that may offer additional insight and context.
Need help?
No worries - we're here for you!
If you have any questions or need assistance, feel free to email us at support@loopwork.co or chat with us using the support beacon at the bottom right of your screen.
Regards,
Loop Subscriptions Team 🙂
Updated on: 30/06/2025
Thank you!